ChatGPT changed how we get answers to some of our questions every day. While the initial load on the platform was low, they handled the UI pretty well. But with recent changes to the platform, you may not be able to see your previous queries if you are running on a free plan (until a week ago) and the platform reached its capacity.

One simple solution for that would be to take notes of your questions and answers and save them somewhere locally (Notion in my case) for you to access. It does sound pretty simple but to what extent? You don’t want to manually copy and paste every single query and its response, right? At least I don’t. I try to automate my workload as much as possible.
How did I achieve this? Enter APIs. They offer a very powerful integration. I have yet another problem to solve, Notion API doesn’t offer webhooks that listen to changes made to a database or page i.e. when a new page is added as such or a block is added to a page. While there might be some other simple solutions to this problem, I chose to solve it using a Social Media platform — Telegram. Telegram offers a beautiful API in terms of bots.
I used Telegram mainly for one reason, I want to take advantage of offline storage. Since Notion is a web-based application, if I am travelling or if my network is down, the App becomes useless to me which is quite annoying if you think about it. Why use Notion in that case you ask? Well, quite frankly it is easy to use and organize.
Challenges:
- I have to find a way to store session history in case I want to continue to chat based on previous queries and responses. You see, on ChatGPT UI when you send a follow-up question, the assistant will read your previous conversations and then provide you with an answer. It needs to know the context of what you are talking about.
- I want to be able to deploy it on a basic server and not think about the insane amount it will cost me in long run.
- Storage - I wanted to log the steps so that I can go back and review if there are any issues with my application. Even though I am developing this for myself, I should have the ability to check what went wrong and fix it before I can scale the application.
Again, I built this application model for personal use, this application cannot handle having multiple users as of now. I am building a second version of the App to distribute to users. If you are interested in receiving an email once that is ready, please feel free to sign up here.
I will build the bot to distribute once requests reach 100. I will also minimize the steps you need to set it up before you can begin to chat.
Steps I followed to build the Bot.
I did the entire project using Python.
Telegram
First, you need to create a new bot using BotFather on Telegram App. It is very simple to use, telegram did a fantastic job in making everyone's life easy. You will get a Bot Token, it is very important to keep that token secure as it controls your bot’s behaviour like receiving messages, reading them, sending messages and so on. Review this page to get started with your bot.
ChatGPT
ChatGPT is the heart of your bot, which is the main purpose of this bot. To get started, you need to get an API key from OpenAI. Go to this page to get your API key. Save your key somewhere secure as you can retrieve it once you click done.
Notion
You could use any other Note taking application if you are not a Notion user. The code needs to be modified according to the application you use. But if you are a Notion user, the project that I am sharing works right out of the box. Go to my integrations page on your browser to create an internal token for your Notion workspace. You can use this template to duplicate into your workspace. If you plan on changing the column names of your database, remember to update them inside your application code as well.
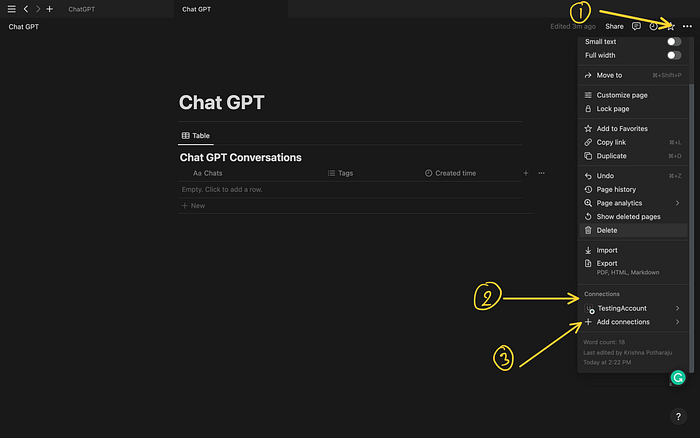
Once you have duplicated the page, click on the menu option (three dots) in the upper right corner of the window. Under connections, add the connection (integration) that you created in the previous step to give the integration access to your Notion page.
Click on the Table and get the view link. Using the link make a note of the database ID.
Your link will be of format https://www.notion.so/<database_id>?v=<>.
Once you have all the keys, follow the steps as indicated in the GitHub repository to set up your application server. You have all the commands that you need within the bot to get started with your conversations with ChatGPT. Start by sending a /start message.
Future Improvements
Currently, this is a very basic integration kind of weekend project. I want to improve the functionality of the bot by adding more commands such as a status command to see if there is a conversation going on. Functionality to add a topic name to the Notion page from within the bot. Some text formatting for better reading capability and so on.
Remember, the current version is not intended to distributing to others (although that should be the case when building a bot).
Feel free to fork the repo and submit a PR if you see anything that can be improved with this version.
Thank you for reading. Have a wonderful day and please share your thoughts or suggestions happy to improve.